Introduction
Speaker diarization is the process of segmenting an audio recording into distinct segments based on who is speaking. It is used in cases where there are multiple speakers in the same audio recording. Some common applications of speaker diarization include meeting transcription, call center analytics, and podcast editing, where identifying speaker is necessary.
For example, in a meeting, speaker diarization can distinguish between the voices of different speakers after transcription to understand what each person said and extract valuable insights. Similarly, call centers can use speaker diarization to analyze conversations between agents and customers and gain insights into agent performance by distinguishing between the segments of the audio that were spoken by the agent/customer.
In this blog post, I will guide you through building a basic speaker diarization API using FastAPI. We’ll containerize the API using Docker and deploy it on HuggingFace Spaces for public usage.
Who Is This Article For?
- Beginners who want to learn how to build and deploy APIs on HuggingFace Spaces
Learning Objectives
By the end of this tutorial, you will:
- Understand the concept and applications of speaker diarization.
- Learn how to build a speaker diarization API using FastAPI.
- Deploy your speaker diarization API to HuggingFace Spaces using Docker.
Prerequisites
To follow along, you’ll need:
- Python 3.8+ installed on your system.
- Basic knowledge of Python, FastAPI, and Docker.
- A HuggingFace account for deployment on HuggingFace Spaces
Building The Speaker Diarization API
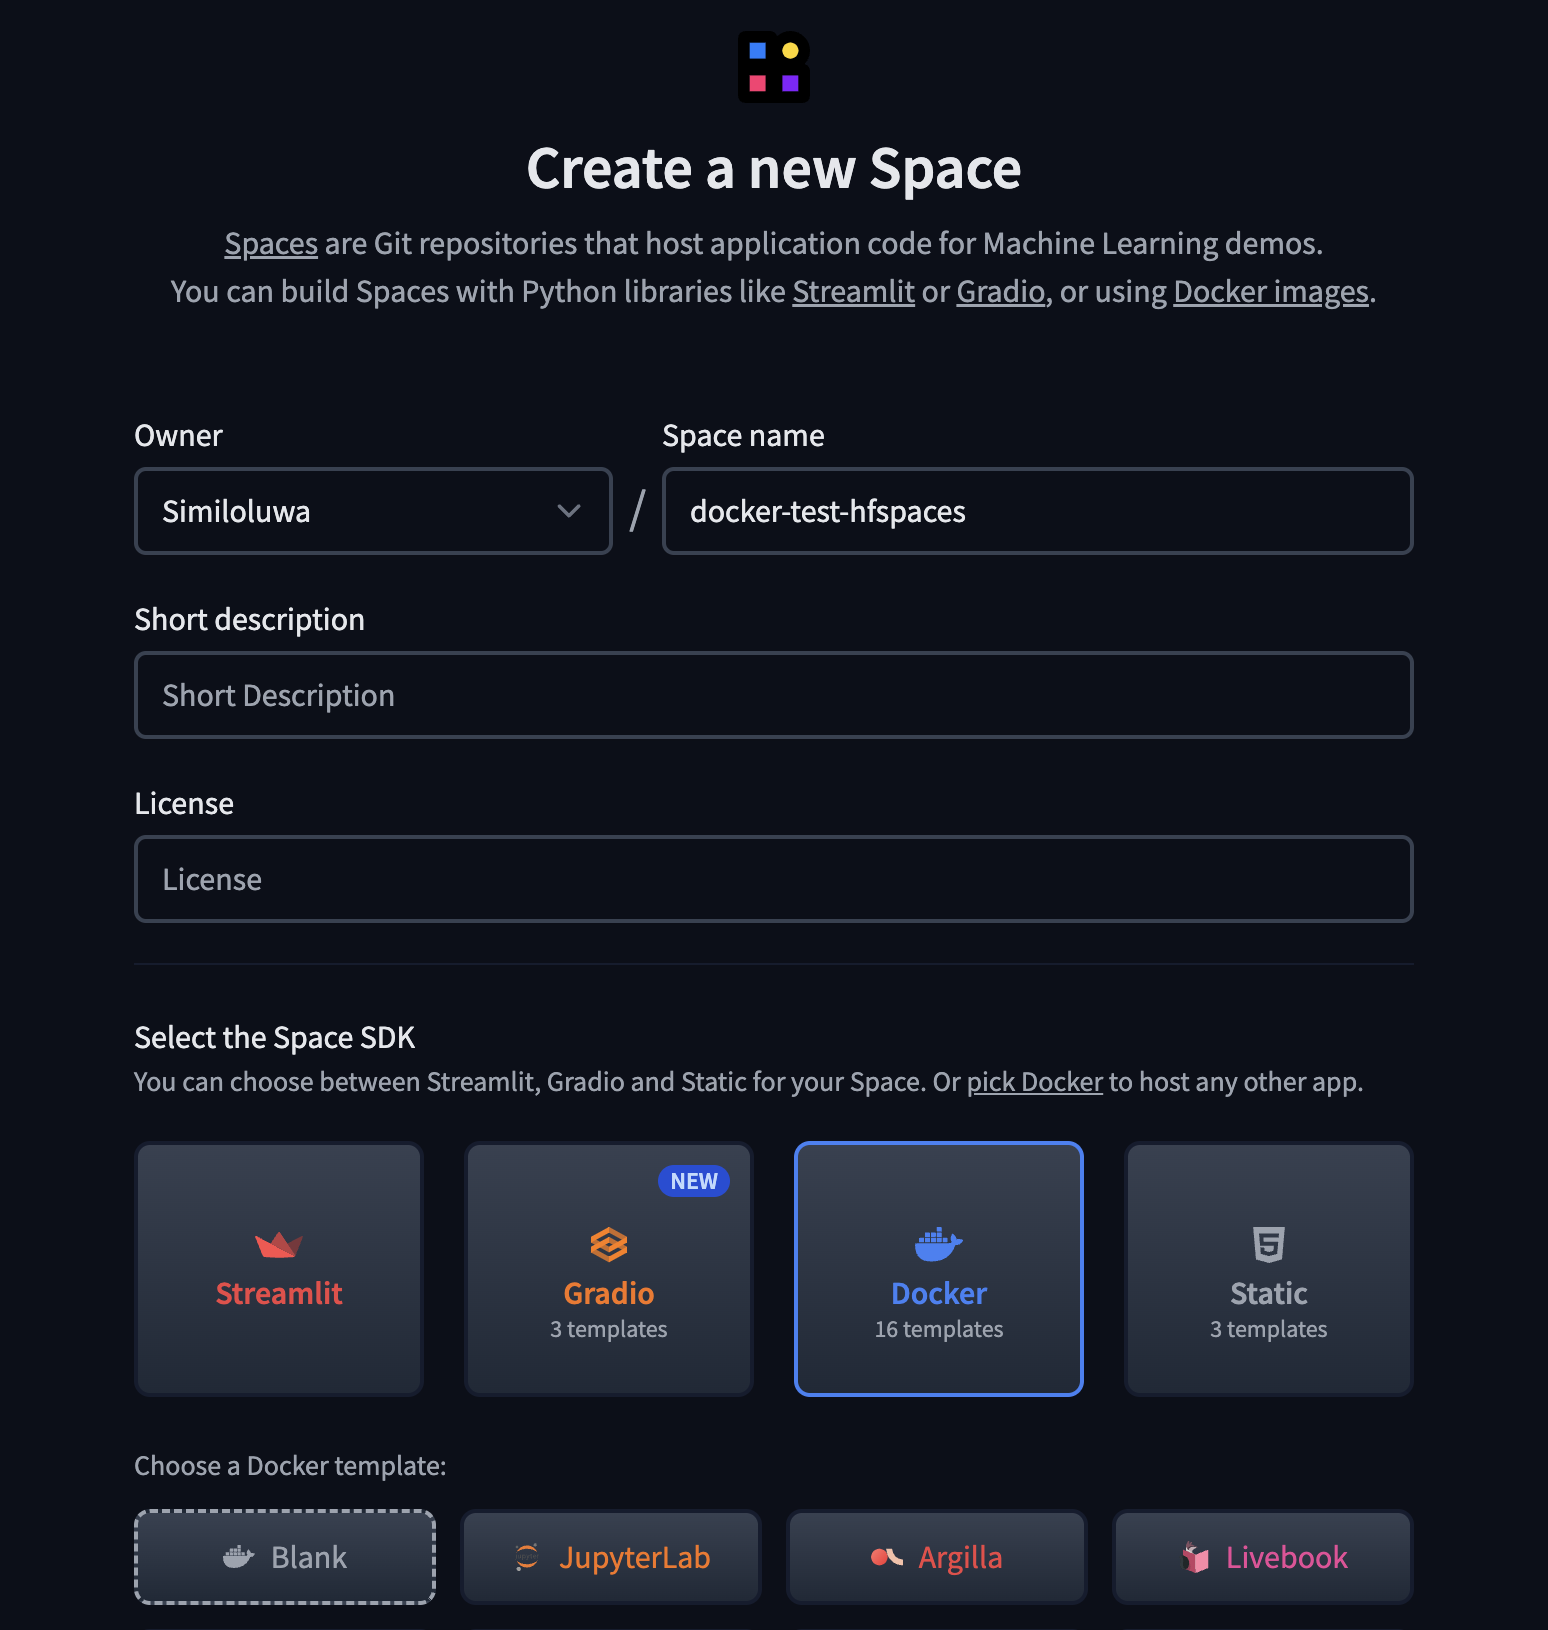
STEP 1: Create a New Space on HuggingFace
Spaces are Git repositories that host application code for Machine learning demos. We need to create a new Space on HuggingFace to setup our application.
Go to HuggingFace Spaces to create a new Space.
- Enter a Space name (e.g.
speaker-diarization-api) and a short description - Choose a License for your app
- Select Docker as the software development kit (SDK) using a blank template
- Create the space
After your Space has been created, clone the application to get started.
# When prompted for a password, use an access token with write permissions.
# Generate one from your settings: https://huggingface.co/settings/tokens
git clone https://huggingface.co/spaces/<your-huggingface-username>/<your-space-name>
STEP 2: Set Up The FastAPI Application
Now that you have setup your new Space and cloned the git repository, we can start developing the FastAPI application.
-
Create a virtual environment in your root folder
$ python -m venv env $ source env/bin/activate # to activate the environment -
Install the required dependencies
The main dependencies for our application include:
FastAPI- The high-performance web framework for building the APIPyannote- An audio and speech processing library, which will be used for speaker diarization.PyTorch
Create a
requirements.txtfile and paste the content below to install the required dependencies for this application.--extra-index-url https://download.pytorch.org/whl/cpu fastapi uvicorn[standard] python-multipart pydantic_settings pydantic torch pyannote.audio python-dotenv numpy==1.23.5 scipy==1.10.1Then install the dependencies using
pip.$ pip install -r requirements.txt -
Project Folder Structure
The file tree below shows the folder structure for this project:
./
├── src/
│   ├── app.py  # main app
│   ├── config.py # configuration settings
│   ├── __init__.py
│   ├── routers/  # for defining app routers
│   │   ├── __init__.py
│   │   ├── diarizer.py
├── test-audio  # contains audio files for testing
│   ├── (...).mp3
│   ├── (...).wav
├── .gitattributes
├── .gitignore
├── Dockerfile
├── packages.txt
├── README.md
|── README.md
STEP 3: Set The Environment Variables
-
Create a
.envfile and set the required environment variables:HF_AUTH_TOKEN=<your_huggingface_auth_token> PORT=<port>Go to https://huggingface.co/settings/tokens to create an manage your HuggingFace access tokens.
-
Create the
config.pyfile to centralize the management of configuration settings and environment variables for the project.import os from functools import lru_cache from pydantic_settings import BaseSettings class Settings(BaseSettings): HF_AUTH_TOKEN: str = os.getenv("HF_AUTH_TOKEN") PORT: int = os.getenv("PORT", 8500) class Config: env_file = ".env" @lru_cache() def get_settings(): return Settings() config = get_settings()
STEP 3: Create The Diarization Endpoint
Now, we will create the diarization endpoint using a FastAPI router. The APIRouter class is used to organize routes within the application.
For the speaker diarization functionality, we will be using a pre-trained diarization model (pyannote/speaker-diarization-3.1) provided by pyannote.
Check out other models provided by pyannote HERE
Code
import os
import json
from typing import List, Optional

import torch
import torchaudio
import tempfile
from pydantic import BaseModel
from pyannote.audio import Pipeline
from fastapi import APIRouter, File, UploadFile, HTTPException, Form

from config import config

router = APIRouter()

# Load the speaker diarization pipeline
pipeline = Pipeline.from_pretrained("pyannote/speaker-diarization-3.1",
                                    use_auth_token=config.HF_AUTH_TOKEN)

class DiarizationResult(BaseModel):
    speaker: str
    start: float
    end: float

class DiarizationSettings(BaseModel):
    num_speakers: Optional[int] = None
    min_speakers: Optional[int] = None
    max_speakers: Optional[int] = None

class DiarizationResponse(BaseModel):
    results: List[DiarizationResult]

@router.post("/diarize", response_model=DiarizationResponse)
async def diarize_audio(body: Optional[DiarizationSettings] = Form(None), file: UploadFile = File(...)):
    # Validate file
    if not file.filename.lower().endswith(('.wav', '.mp3', '.flac')):
        raise HTTPException(400, detail="Invalid file format. Please upload a WAV, MP3, or FLAC file.")

    # Create a temporary file
    with tempfile.NamedTemporaryFile(delete=False, suffix=os.path.splitext(file.filename)[1]) as temp_file:
        # Write uploaded file content to temp file
        content = await file.read()
        temp_file.write(content)
        temp_file_path = temp_file.name

    try:
        # Load audio file
        waveform, sample_rate = torchaudio.load(temp_file_path)

        # Ensure the audio is mono (single channel)
        if waveform.shape[0] > 1:
            waveform = torch.mean(waveform, dim=0, keepdim=True)

        settings = body if body else DiarizationSettings(
            num_speakers=None,
            min_speakers=None,
            max_speakers=None
        )

        # Perform diarization
        if settings.num_speakers is not None:
            print(f"Diarizing with exactly {settings.num_speakers} speakers")
            diarization = pipeline({"waveform": waveform, "sample_rate": sample_rate, "num_speakers": settings.num_speakers})
        elif settings.min_speakers is not None and settings.max_speakers is not None:
            print(f"Diarizing with {settings.min_speakers} to {settings.max_speakers} speakers")
            diarization = pipeline({"waveform": waveform, "sample_rate": sample_rate, "min_speakers": settings.min_speakers, "max_speakers": settings.max_speakers})
        else:
            print("Diarizing with default speaker settings.")
            diarization = pipeline({"waveform": waveform, "sample_rate": sample_rate})

        # Process results
        results = []
        for turn, _, speaker in diarization.itertracks(yield_label=True):
            results.append(DiarizationResult(speaker=speaker, start=turn.start, end=turn.end))

        return DiarizationResponse(results=results)

    except Exception as e:
        raise HTTPException(500, detail=f"An error occurred during processing: {str(e)}")

    finally:
        # Clean up the temporary file
        os.unlink(temp_file_path)
The core functionality resides in the diarize_audio endpoint.
-
The user sends a
POSTrequest to thediarizeendpoint, including an audio file (WAV, MP3, or FLAC) and optional diarization settings (e.g., number of speakers, minimum speakers, and maximum speakers). -
The API validates the file format and stores the upload audio to a temporary file
-
Then the temporary audio file is loaded using
torchaudio -
The pre-trained
pyannote.audiopipeline then processes the loaded audio file to perform speaker diarization -
The API processes the diarization output and formats it into a structured list of results. Each result includes:
- Speaker label (e.g,
SPEAKER_O1) - Start time of the speech segment
- End time of the speech segment
- Speaker label (e.g,
-
The API finally sends a JSON response containing the diarization results and cleans up the temporary file created earlier to free up storage.
To use this endpoint in your main FastAPI application, you need to attach it using the .include_router() method as shown below:
import os

import uvicorn
from fastapi import FastAPI

from config import config
from routers import diarizer

app = FastAPI()

# Attach the diarization endpoint router
app.include_router(diarizer.router, prefix="/api/v1")

@app.get("/healthcheck")
def healthcheck():
    return {
        "status": True,
        "message": "Server is healthy!"
    }

if __name__ == "__main__":
    uvicorn.run(app, host="0.0.0.0", port=config.PORT)
Hurray 🎉. You can now start the FastAPI server locally using uvicorn to run the application and test the endpoint.
To test diarization API, simply upload an audio file to the api/v1/diarize endpoint.
Your will get a response similar to the one below:
{"results":[{"speaker":"SPEAKER_00","start":0.03096875,"end":29.12346875},{"speaker":"SPEAKER_01","start":29.12346875,"end":29.157218750000002},{"speaker":"SPEAKER_00","start":31.03034375,"end":31.06409375},{"speaker":"SPEAKER_01","start":31.06409375,"end":41.54346875},{"speaker":"SPEAKER_01","start":42.26909375,"end":59.970968750000004}]} To know what was spoken for each speaker segment, you can use a speech-to-text library like Whisper to transcribe the audio content and map the transcriptions to the corresponding speaker segments.
STEP 4: Containerizing The API Using Docker
Now that we have developed and tested the speaker diarization API, we need to containerize it using docker for deployment on the HuggingFace Space that was created earlier.
To containerize the app, create a Dockerfile and paste the following:
# Use Python 3.9 as the base image
FROM python:3.9

# Create a new user
RUN useradd -m -u 1000 user
USER user
ENV PATH="/home/user/.local/bin:$PATH"

# Set the working directory inside the container
WORKDIR /app

# Install the dependencies from the requirements.txt file
COPY --chown=user ./requirements.txt requirements.txt
RUN pip install --no-cache-dir --upgrade -r requirements.txt

# Copy the source code into the container
COPY --chown=user src /app

# Set the default command to run the app with uvicorn on port 7860
CMD ["uvicorn", "app:app", "--host", "0.0.0.0", "--port", "7860"]
This Dockerfile simply defines the environment, installs the dependences,
and sets up the app to run in a container, to ensure that it can be deployed to
the HuggingFace Space.
The port is set to 7860 because the HuggingFace Docker Space needs to listen on that port.
Read the full documentation for Docker Spaces here.
STEP 5: Deploying The App
To deploy the app, you only need to commit and push your code to the HuggingFace Space’s repository using git.
$ git add .
$ git commit -m <commit_msg>
$ git push
After pushing, your space should switch to the Building state. Once, the Building is completed, if everything goes well, your space
will switch to the Running state.
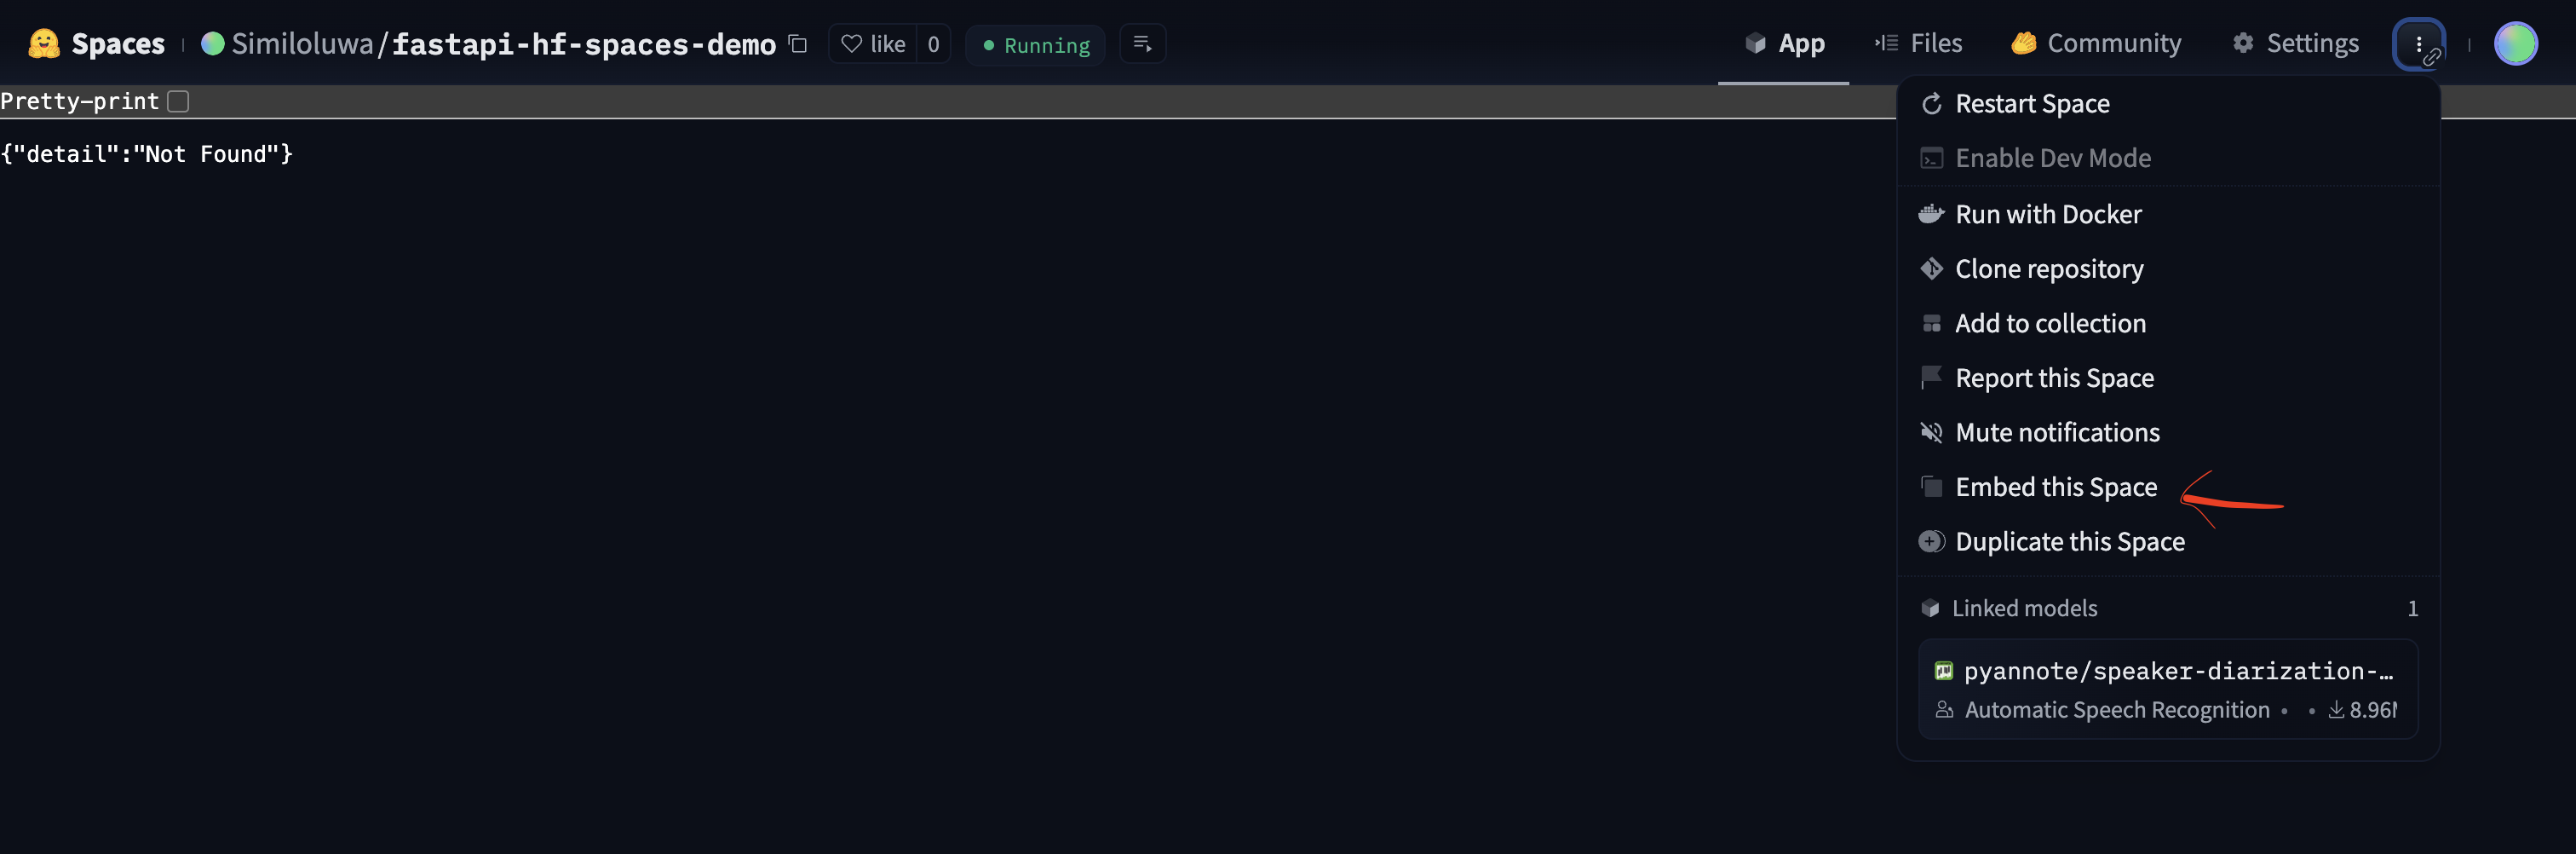
Click on the button with three vertical dots and then click on the Embed Space option to copy the public link to your Space.
STEP 6: Testing The Deployed API
We can test the deployed API using curl or any other API testing tool like Postman, Insomnia, etc.
Firstly, let’s test the healthcheck endpoint:
curl "https://similoluwa-fastapi-hf-spaces-demo.hf.space/healthcheck"Response
{"status":true,"message":"Server is healthy!"} Let’s test the diarization endpoint:
curl -X POST "https://similoluwa-fastapi-hf-spaces-demo.hf.space/api/v1/diarize" \
    -H "Content-Type: multipart/form-data" \
    -F "file=@./test-audio/therapy.wav"
Response:
{"results":[{"speaker":"SPEAKER_00","start":0.03096875,"end":29.12346875},{"speaker":"SPEAKER_01","start":29.12346875,"end":29.157218750000002},{"speaker":"SPEAKER_00","start":31.03034375,"end":31.06409375},{"speaker":"SPEAKER_01","start":31.06409375,"end":41.54346875},{"speaker":"SPEAKER_01","start":42.26909375,"end":59.970968750000004}]} Conclusion
This tutorial covered the basics of deploying a speaker diarization API developed using FastAPI to a HuggingFace Space via Docker. I hope this helps you to build more complex applications.